- Sign In
- |
- Sign Up
- |
- My Quote (0)
- |
- CART (0)


Monitoring Solutions for Water, Indoor, Outdoor, & Agriculture
This kit has everything you need for a 3-meter tripod configuration of the HOBO Weather Station or HOBO Micro Station. Includes a 3m Tripod (M-TPA), Grounding Kit (M-GKA), Guy Wire Kit (M-GWA), 1/2" Stake Kit (M-SKA), and Mast Level (M-MLA).
This kit has everything you need for a 3-meter tripod configuration of the HOBO Weather Station or HOBO Micro Station. Includes a 3m Tripod (M-TPA), Grounding Kit (M-GKA), Guy Wire Kit (M-GWA), 1/2" Stake Kit (M-SKA), and Mast Level (M-MLA).
This product exceeds standard shipping dimensions/weight, as such it does not qualify for free shipping. We will contact you with your shipping costs.
This kit has everything you need for a 3-meter tripod configuration of the HOBO Weather Station or HOBO Micro Station. The 3-meter tripod accommodates moderately sloping terrain.
NOTE: If you want to extend the Guy Wire out past the feet on the tripod, you can purchase another 1/2" (1.27 cm) Stake Kit (M-SKA).
| Cross Arm Height Range | 9 to 10.5' (2.74 to 3.20 m) |
| Leg Height (To Top of Legs) | 4.3' (1.32 m) |
| Mast Diameter | 1.63" (4.1 cm) |
| Tripod Footprint | 3' (91 cm) |
| Weight | 28 lbs (12.7 kg) |
| Maxium Slope | 13° for installation on moderately uneven ground |
Weather stations, like the HOBO RX3000 series, monitor environmental parameters such as temperature, wind speed, wind direction, rainfall, soil moisture, barometric pressure and photosynthetically-active radiation (PAR).
Moreover, their deployments are often located in harsh environments. Since weather stations monitor conditions 24/7 at a specific site, researchers can obtain precise measurements instead of making estimates based on regional weather data.
The following is a short guide on proper weather station deployment and safe practises. For a full, in-depth run-down on weather station deployment, please read the full guide here!

A typical weather station consists of a data logger and sensors mounted on a metal tripod.
The system typically runs on battery power or a combination of solar power and a rechargeable battery.
Key components of a weather station include:

Some researchers need data on general weather conditions for an area. In these applications, researchers should place their weather stations in open, unobstructed locations. Buildings and trees can affect temperature, relative humidity, rainfall, wind speed, and wind direction. For this reason, weather stations should also be at a distance of at least ten times the height of nearby trees and buildings away from these obstructions.
Weather stations should be located at least ten times the height of nearby trees and buildings away from these obstructions.

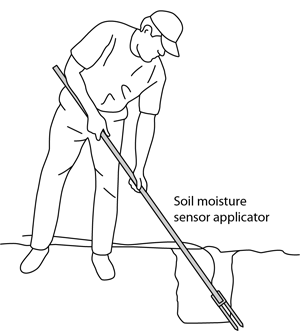
Accurate soil moisture measurement probes need to have good contact with surrounding soil. Here are some tips to help with installation:
After installing the sensor into the soil, partially backfill the hole, allowing soil to settle around the sensor. Pack the soil to the same density as the undisturbed soil. Then thoroughly water the soil around the sensor to cause the soil to fully settle around the sensor.


While some data logging weather stations can be difficult to configure and often require the services of a professional system integrator for setup, today’s most advanced systems do not require programming or complex wiring. Instead, these systems leverage Smart Sensor technology, that provides the user with plug-and-play performance: once a sensor is plugged into the data logger, it is automatically recognized and can begin taking measurements. This type of system architecture can significantly reduce setup and deployment time, and reduce or eliminate the need for specialized integrator assistance.
Lawn mowers, tractors, and chemicals can damage sensor cables. Moreover, rodents, birds, cattle, and other animals can bite, peck, or trample on sensor cables. For this reason, researchers often cover cables with conduit.
Proper grounding of a weather station is advisable, as it provides protection from electrical interference and thus can help minimize the chance of system failures in the field.
As a general rule, replace rechargeable batteries every 3 to 5 years and regular batteries once a year. However, battery life depends on logging intervals. For example, with certain weather stations, if the logging interval is set at 1 second, the batteries last 30 to 50 days. If the interval is set at 1 minute, the batteries should last one year. Furthermore, make sure the batteries’ Use Before dates are at least two years from the current date.


Relative humidity, barometric pressure, wind direction and wind speed, and PAR sensors should be checked or calibrated annually.
For even more on this, read our full guide!
Click on a category to view a selection of compatible accessories with the Onset HOBO M-TPA-KIT Weather Station Tripod Kit, 9.8'.

| Cross Arm Height Range | 9 to 10.5' (2.74 to 3.20 m) |
| Leg Height (To Top of Legs) | 4.3' (1.32 m) |
| Mast Diameter | 1.63" (4.1 cm) |
| Tripod Footprint | 3' (91 cm) |
| Weight | 28 lbs (12.7 kg) |
| Maxium Slope | 13° for installation on moderately uneven ground |
Weather stations, like the HOBO RX3000 series, monitor environmental parameters such as temperature, wind speed, wind direction, rainfall, soil moisture, barometric pressure and photosynthetically-active radiation (PAR).
Moreover, their deployments are often located in harsh environments. Since weather stations monitor conditions 24/7 at a specific site, researchers can obtain precise measurements instead of making estimates based on regional weather data.
The following is a short guide on proper weather station deployment and safe practises. For a full, in-depth run-down on weather station deployment, please read the full guide here!
A typical weather station consists of a data logger and sensors mounted on a metal tripod.
The system typically runs on battery power or a combination of solar power and a rechargeable battery.
Key components of a weather station include:
Some researchers need data on general weather conditions for an area. In these applications, researchers should place their weather stations in open, unobstructed locations. Buildings and trees can affect temperature, relative humidity, rainfall, wind speed, and wind direction. For this reason, weather stations should also be at a distance of at least ten times the height of nearby trees and buildings away from these obstructions.
Weather stations should be located at least ten times the height of nearby trees and buildings away from these obstructions.
Accurate soil moisture measurement probes need to have good contact with surrounding soil. Here are some tips to help with installation:
After installing the sensor into the soil, partially backfill the hole, allowing soil to settle around the sensor. Pack the soil to the same density as the undisturbed soil. Then thoroughly water the soil around the sensor to cause the soil to fully settle around the sensor.
While some data logging weather stations can be difficult to configure and often require the services of a professional system integrator for setup, today’s most advanced systems do not require programming or complex wiring. Instead, these systems leverage Smart Sensor technology, that provides the user with plug-and-play performance: once a sensor is plugged into the data logger, it is automatically recognized and can begin taking measurements. This type of system architecture can significantly reduce setup and deployment time, and reduce or eliminate the need for specialized integrator assistance.
Lawn mowers, tractors, and chemicals can damage sensor cables. Moreover, rodents, birds, cattle, and other animals can bite, peck, or trample on sensor cables. For this reason, researchers often cover cables with conduit.
Proper grounding of a weather station is advisable, as it provides protection from electrical interference and thus can help minimize the chance of system failures in the field.
As a general rule, replace rechargeable batteries every 3 to 5 years and regular batteries once a year. However, battery life depends on logging intervals. For example, with certain weather stations, if the logging interval is set at 1 second, the batteries last 30 to 50 days. If the interval is set at 1 minute, the batteries should last one year. Furthermore, make sure the batteries’ Use Before dates are at least two years from the current date.
Relative humidity, barometric pressure, wind direction and wind speed, and PAR sensors should be checked or calibrated annually.
For even more on this, read our full guide!
Click on a category to view a selection of compatible accessories with the Onset HOBO M-TPA-KIT Weather Station Tripod Kit, 9.8'.